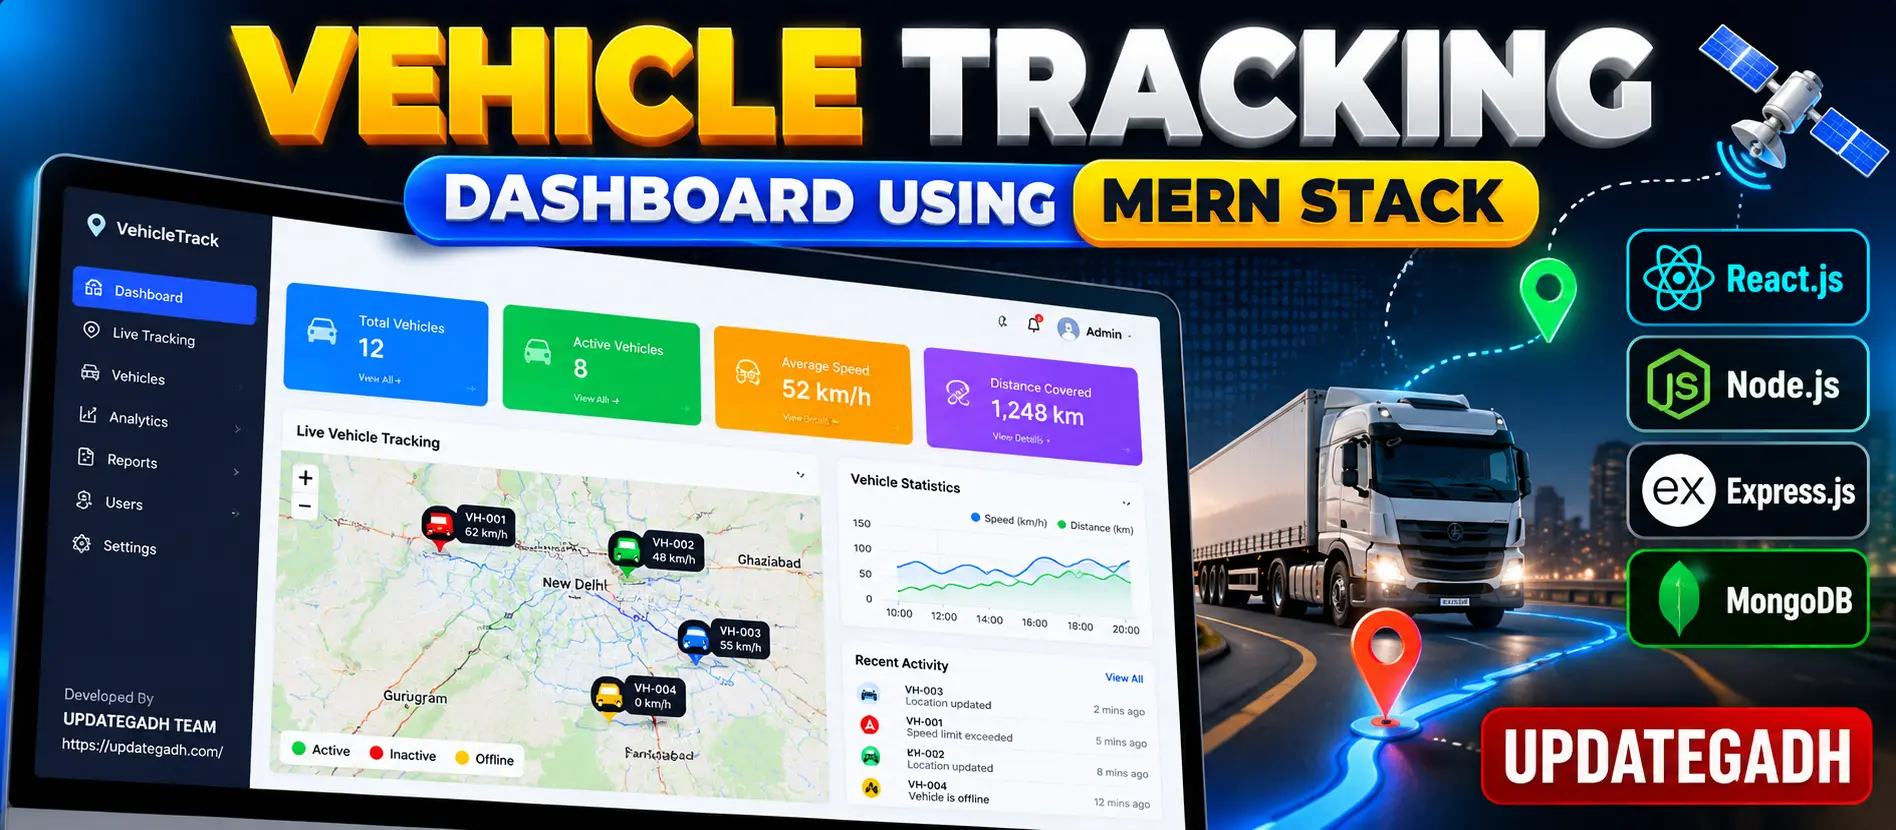
Vehicle Tracking Dashboard Using MERN Stack
Vehicle Tracking Dashboard Using MERN Stack is a full-stack fleet monitoring application for managing vehicle records, viewing vehicle locations on interactive maps, monitoring speed and distance, and analyzing fleet activity. Built with MongoDB, Express.js, React.js, Node.js, Leaflet, Recharts and Socket.IO, it includes Admin and Viewer roles, real-time updates, vehicle alerts and CSV report exports.
What You Will Get
Project Overview
The Vehicle Tracking Dashboard Using MERN Stack is a web-based application designed to monitor vehicles, manage fleet information, visualize vehicle locations and analyze vehicle performance through an interactive dashboard.
The project uses React.js for the frontend, Node.js and Express.js for backend development, and MongoDB for storing vehicle information and tracking history. Leaflet and OpenStreetMap provide interactive maps, Recharts displays analytics, and Socket.IO supports real-time communication between the server and connected clients.
The application provides separate Admin and Viewer roles. Administrators can manage vehicle records, while Viewers can access monitoring information without modifying or deleting vehicles.
Available Features
1. Admin Dashboard
- View total vehicles and active vehicle counts.
- Monitor average speed and recorded distance.
- Review vehicle activity through dashboard charts.
- Navigate between tracking, vehicle management, analytics and alerts.
- View statistics generated from actual database records.
2. Vehicle Management
- Add, view, edit and delete vehicle records.
- Store vehicle ID, name, registration number, driver and vehicle type.
- Search and filter vehicles by status or vehicle information.
- Sort records by vehicle ID, speed, status, distance and last update.
3. Interactive Vehicle Tracking
- Display vehicle markers on a Leaflet map using OpenStreetMap tiles.
- View vehicle coordinates, speed and last update time.
- Distinguish active, inactive and offline vehicles using different marker colors.
- Receive vehicle information updates through Socket.IO.
- Store location history with timestamps and data-source information.
4. Analytics and Reports
- Compare current vehicle speeds using charts.
- View stored location activity and distance summaries.
- Identify vehicles exceeding the configured speed limit.
- Identify offline vehicles that may require attention.
- Download available vehicle records as CSV reports.
5. Authentication and Security
- JWT-based user authentication.
- Separate Admin and Viewer permissions.
- Protected API routes and request validation.
- Environment-based configuration for database connections and application secrets.
Administrator Workspace
Administrators can manage vehicle records, review dashboard statistics, monitor fleet activity, inspect alerts and export vehicle reports. The dashboard provides an overview of vehicle status, speed, distance and recorded movement information.
Viewer Workspace
Viewers can access vehicle monitoring information without permission to modify or delete vehicle records. This role is suitable for read-only access to tracking maps, vehicle details and available monitoring information.
Interactive Map and Location History
The tracking interface uses Leaflet and OpenStreetMap to display vehicle markers and their recorded coordinates. Location history includes timestamps and information about the data source, helping users distinguish simulated movement from other location data.
Real-Time Communication
Socket.IO enables the backend to send vehicle updates to connected clients. This allows the dashboard to reflect incoming vehicle information without relying solely on manual page refreshes.
GPS Configuration and Limitations
The supplied project includes simulated vehicle movement for development and testing. Simulated coordinates are not genuine live GPS data. Real vehicle tracking requires a trusted GPS device or provider API, authenticated incoming data, coordinate validation and appropriate backend integration.
Technology Stack
- Frontend: React.js, JavaScript and CSS
- Backend: Node.js and Express.js
- Database: MongoDB
- Database ODM: Mongoose
- Mapping: Leaflet and OpenStreetMap
- Charts: Recharts
- Real-Time Communication: Socket.IO
- Authentication: JSON Web Tokens (JWT)
Software Requirements
- Node.js and npm
- MongoDB or MongoDB Atlas
- Visual Studio Code
- A modern web browser
- Internet access for OpenStreetMap tiles
Installation and Execution
Extract the project ZIP file and open the vehicle-tracking-dashboard folder in Visual Studio Code. Configure the backend environment variables, install dependencies and start the backend server.
Configure the Backend
cd server
copy .env.example .env
npm install
Open server/.env and configure the MongoDB connection and JWT secret. Ensure MongoDB is running if you are using a local database.
Start the Backend Server
npm run devThe backend normally runs at http://localhost:5000. It initializes demo users and sample vehicles when the database is empty.
Install and Start the Frontend
Open a second VS Code terminal and run:
cd client
copy .env.example .env
npm install
npm run dev
Open http://localhost:5173 in your browser.
Development Login Credentials
The project documentation provides the following development Admin credentials:
- Email: admin@updategadh.local
- Password: Admin@12345
Viewer credentials are provided in the project README. Change default credentials and application secrets before any production deployment.
Project Applications
- Fleet monitoring and vehicle record management.
- Vehicle location visualization.
- Speed and distance analysis.
- Offline vehicle and speed-limit alerts.
- Real-time dashboard development.
- Full-stack MERN development and mapping integration.
More Details and Full Documentation
Project Modules
2. Role-Based Access Control Module
3. Admin Dashboard Module
4. Viewer Monitoring Module
5. Vehicle Management Module
6. Vehicle Search and Filtering Module
7. Interactive Map Tracking Module
8. Vehicle Coordinate Management Module
9. Vehicle Speed Monitoring Module
10. Distance and Movement History Module
11. Real-Time Socket.IO Communication Module
12. Vehicle Status Monitoring Module
13. Speed-Limit Alert Module
14. Offline Vehicle Alert Module
15. Analytics and Charts Module
16. CSV Report Export Module
17. MongoDB Database Integration Module
18. GPS Provider Integration Module
Installation Guide
1. Install Node.js and npm on your computer.
2. Install MongoDB Community Server or configure MongoDB Atlas.
3. Install Visual Studio Code.
4. Extract the project ZIP file and open the vehicle-tracking-dashboard folder in VS Code.
5. Open a terminal in the project directory.
6. Navigate to the backend folder using: cd server
7. Create the environment file using: copy .env.example .env
8. Configure the MongoDB connection and JWT secret in server/.env.
9. Install backend dependencies using: npm install
10. Start the backend server using: npm run dev
11. Open a second terminal in the project directory.
12. Navigate to the frontend folder using: cd client
13. Create the frontend environment file using: copy .env.example .env
14. Install frontend dependencies using: npm install
15. Start the frontend using: npm run dev
16. Open http://localhost:5173 in your browser.
17. Sign in using the development Admin credentials documented in the source: admin@updategadh.local and Admin@12345.
18. Change the default credentials before production deployment.
19. Open vehicle management to add, view, edit and delete vehicle records.
20. Open the tracking page to inspect vehicle markers, coordinates, speeds and update timestamps.
21. Review analytics and alerts, then test the CSV export feature.
22. Use Viewer credentials from the project README to test read-only monitoring access.
23. Remember that simulated movement is used by default; configure a trusted GPS device or provider API for genuine live tracking.
FAQ for this project coming soon.
No reviews yet. Be the first to review!
Write a Review
Related Projects
 65% OFF
Featured
65% OFF
Featured
 55% OFF
Featured
55% OFF
Featured
 50% OFF
Featured
50% OFF
Featured
 63% OFF
Featured
63% OFF
Featured