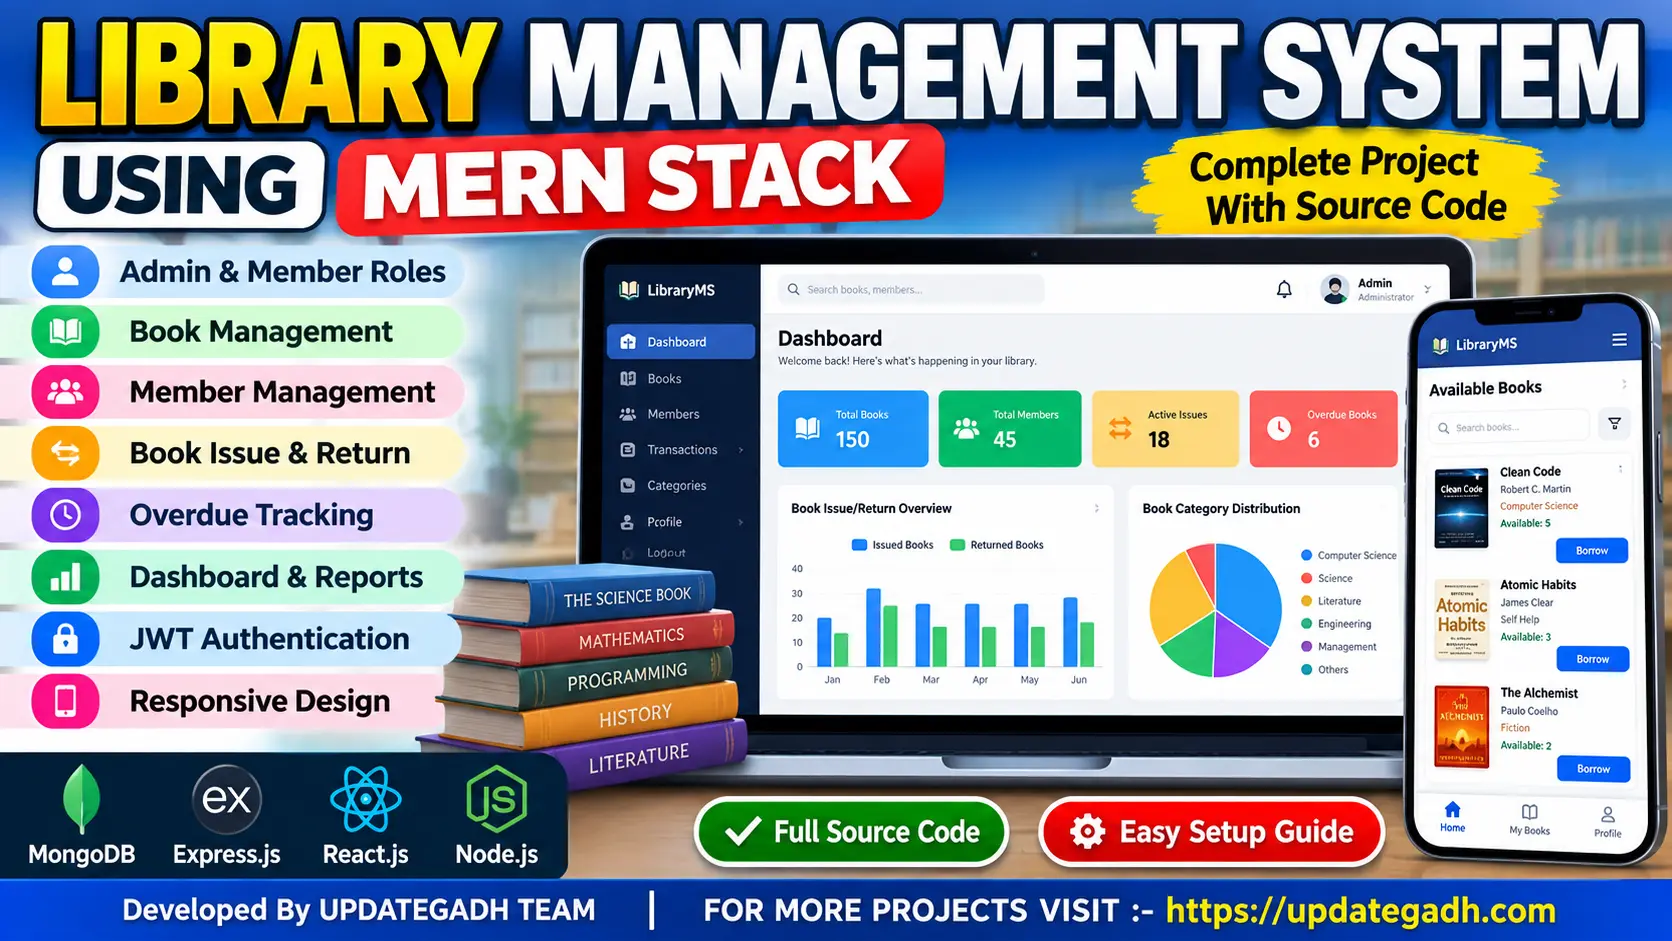
Library Management System Using MERN Stack
Library Management System Using MERN Stack is a full-stack web application for managing books, library members, book issue and return transactions, and overdue loans. Built with MongoDB, Express.js, React.js and Node.js, it includes Admin and Member roles, JWT authentication, book availability tracking, search and filtering, transaction history and a responsive interface.
What You Will Get
Project Overview
The Library Management System Using MERN Stack is a web-based application designed to simplify and digitize everyday library operations. It provides a centralized platform where administrators can manage books, members and borrowing transactions, while members can browse the book catalogue and track their issued books.
The application is developed using MongoDB, Express.js, React.js and Node.js. It includes separate Admin and Member roles, JWT-based authentication, book availability management and a responsive user interface. The system helps reduce manual recordkeeping and organizes library information in one place.
Available Features
1. User Authentication
- Member registration and login.
- JWT-based authentication.
- Password hashing using bcrypt.
- Role-based access for administrators and members.
2. Admin Dashboard
- View library statistics.
- Manage books and member accounts.
- Monitor borrowing activities.
- Review active and overdue loans.
3. Book Management
- Add, update and delete book records.
- Store book titles, authors, ISBNs and categories.
- Maintain book quantities and availability information.
- Search and filter the book catalogue.
- Validate duplicate ISBNs and other invalid requests.
4. Member Management
- Create and manage member accounts.
- Update member information.
- Deactivate accounts when required.
- Review member borrowing activity.
5. Book Issue and Return
- Record book borrowing transactions.
- Maintain issue dates, due dates and return dates.
- Update available book quantities when books are issued or returned.
- Prevent borrowing when no copies are available.
6. Member Dashboard
- Browse the available book catalogue.
- Search for books by their details.
- Borrow available titles.
- View current loans and previous transactions.
- Check due dates and overdue books.
- View and update personal profile information.
7. Overdue Tracking
The application identifies active borrowing transactions whose due dates have passed. This helps administrators monitor overdue books and members review their outstanding loans.
8. Transaction History
Borrowing records include active and completed transactions. Administrators and members can review relevant transaction information according to their access permissions.
9. Input Validation and Error Handling
The system validates requests and handles conditions such as unavailable books, duplicate ISBNs and invalid transactions. These checks help maintain consistent library records.
10. Responsive Interface
The React-based interface is designed to work across desktop and mobile screen sizes, making library information accessible through modern web browsers.
Administrator Workspace
Administrators can access the Admin Dashboard to manage book records, update quantities, maintain member accounts, deactivate members and monitor borrowing activity. They can also review library statistics and identify active or overdue loans.
Member Workspace
Members can register, sign in, browse available books, search the catalogue and borrow available titles. Their workspace provides access to current loans, previous transactions, due dates and profile management.
Book Availability Management
The application maintains available book quantities as borrowing and return transactions are processed. Availability checks help prevent a book from being borrowed when no copies remain available.
Technology Stack
- Frontend: React.js, JavaScript and CSS
- Frontend Build Tool: Vite
- Backend: Node.js and Express.js
- Database: MongoDB
- ODM: Mongoose
- Authentication: JSON Web Tokens (JWT)
- Password Security: bcrypt
- API: REST API
- Development Environment: Visual Studio Code
Software Requirements
- Node.js and npm
- MongoDB Community Server or MongoDB Atlas
- Visual Studio Code
- A modern web browser
- Internet access for installing dependencies
Installation Guide
Extract the project ZIP file and open the project folder in Visual Studio Code. Configure the backend environment variables, install the backend and frontend dependencies, create the administrator account and start both development servers.
Configure the Backend
cd backend
copy .env.example .env
Update the .env file with your MongoDB connection and secure administrator credentials. Ensure MongoDB is running before starting the backend.
Install and Start the Backend
npm install
npm run create-admin
npm run dev
Install and Start the Frontend
Open a second terminal in the project folder and run:
cd frontend
npm install
npm run dev
The backend normally runs at http://localhost:5000, while Vite normally serves the frontend at http://localhost:5173. Keep both terminals running while using the application.
More Details and Full Documentation
Project Modules
2. JWT Authentication Module
3. Role-Based Access Control Module
4. Admin Dashboard Module
5. Book Management Module
6. Book Search and Filtering Module
7. Member Management Module
8. Book Issue Module
9. Book Return Module
10. Book Availability Tracking Module
11. Overdue Loan Tracking Module
12. Transaction History Module
13. Member Dashboard Module
14. Profile Management Module
15. Input Validation and Error Handling Module
16. MongoDB Database Integration Module
17. REST API Module
18. Responsive User Interface Module
Installation Guide
1. Install Node.js and npm on your computer.
2. Install MongoDB Community Server or configure a MongoDB Atlas database.
3. Install Visual Studio Code.
4. Extract the project ZIP file and open the extracted folder in VS Code.
5. Open a terminal in the backend directory using: cd backend
6. Create the environment configuration file using: copy .env.example .env
7. Configure MONGO_URI, JWT_SECRET, JWT_EXPIRES_IN, CLIENT_URL, LOAN_DAYS, ADMIN_NAME, ADMIN_EMAIL and ADMIN_PASSWORD in the .env file.
8. Replace the example JWT secret and administrator password with secure values.
9. Ensure MongoDB is running and the configured database connection is correct.
10. Install backend dependencies using: npm install
11. Create the administrator account using: npm run create-admin
12. Start the backend server using: npm run dev
13. Confirm that the backend API normally runs at http://localhost:5000.
14. Open a second terminal in VS Code and navigate to the frontend directory using: cd frontend
15. Install frontend dependencies using: npm install
16. Start the frontend using: npm run dev
17. Open the local URL displayed by Vite, normally http://localhost:5173.
18. Sign in using the administrator credentials configured during setup.
19. Add book records and manage member accounts from the Admin Dashboard.
20. Register a member account and test book browsing, borrowing and transaction history.
21. Verify book quantities after issue and return operations.
22. Check overdue loan tracking and profile management.
23. Keep the frontend and backend terminals running while using the application.
FAQ for this project coming soon.
No reviews yet. Be the first to review!
Write a Review
Related Projects
 63% OFF
Featured
63% OFF
Featured
 55% OFF
Featured
55% OFF
Featured
 65% OFF
Featured
65% OFF
Featured
 50% OFF
Featured
50% OFF
Featured